Breakfast Bananas with Spiced Agave
I am so pleased to say that we have finally moved into our new place! It is out of the city center and right next to the lake in a lovely area called Rotherbaum (Red Tree in German). After living in city centers for many years now I forgot what it’s like to only hear the trees blowing at night.
So after many weeks of slowly unpacking and a few trips to IKEA we finally able to enjoy a meal at our dining room table. Weekend breakfast being my favorite, consist of a brightly colored fresh fruit salad. But in my new, double the size kitchen I have the counter space to be more creative. So here are 2 versions of a twist on the normal fruit salad, Breakfast Bananas in: Berry flavor with Raspberries, Pecans and Lemon Cream; and Tropical flavor with Mango, Macadamia Nuts and Coconut Cream. For presentation purposes I made a half recipe of both for the photo above. Serve it with Spiced Agave on the side and drizzle right before you eat. Enjoy these for breakfast, dessert or make the cream and agave in advance and take it to work for the afternoon sweet tooth cravings!
Breakfast Bananas with Spiced Agave
Breakfast Bananas:
- 2 Bananas
- 1 recipe for Lemon or Coconut Cream (recipe follows)
- 1/2 c Raspberries, Mango or other fruit
- 1/4 c Pecans, Macadamia or other nuts
- 1 tsp Dried Unsweetened Shaved Coconut
- 1 recipe for Spiced Agave (recipe follows)
Slice the bananas lengthwise and set on a plate with the flat/ cut side up. Spoon the cream over the bananas and top with fruit and nuts. Sprinkle with coconut and serve with the left over fruit and agave, allowing your guests to drizzle themselves.
Lemon Cream:
- 1/2 c Cashews (optional, soaked for 30 min)
- 1 1/2 tbls Lemon Juice
- 1 tbls Filtered Water
- 1 tbls Agave Nectar
- Pinch of Vanilla Powder
Coconut Cream:
- 8 + 3 tbls Dried Unsweetened Shaved Coconut, separated
- 6 tbls Filtered Water
- 2 tbls Fresh Young Coconut Meat or Cashews (optional, soaked for 30 min)
- 1/2 tbls Pulp from the Coconut Milk
- 1/2 tsp Agave Nectar
Blend 8 tbls of dried coconut with the water for 30 seconds. Strain through a nut seed bag or mesh metal sieve to produce 3 1/2 – 4 tbls of Coconut Milk. Blend 3 tbls Coconut Milk with the rest of the ingredients in a Magic Bullet using the flat blade or blender until completely smooth.
Spiced Agave:
- 1 tbls Agave Nectar
- 1/2 tsp Pumpkin Pie Spice (Cinnamon, Nutmeg, Ginger and Cloves)
In a small bowl, shift in spices over the agave nectar being sure to stir continually to prevent lumps.
Serves 2
Spiderweb Double Chocolate Chip Cookies
 With Halloween coming closer, all weekend I have been in full spirit making Halloween inspired yum-yums and watching the Munsters. I have decided that if I could be anyone, it would be Lilly Munster. I would dress like it was Halloween everyday, decorate the entire house like a haunted house and make Halloween inspired dinners every night for my family. So to start, I made these Spiderweb Double Chocolate Chip Cookies. Chewy and chocolatie, they are perfect to enjoy with almond milk or bat milk, if we were in the Munsters house!
Spiderweb Double Chocolate Chip Cookies
Spiderweb Frosting:
-
1/4 c Cashews
-
1 tbls Agave Nectar
-
2 tsp Coconut Oil, melted
- 1 tsp Filtered Water
In a Magic Bullet using the flat blade or in a blender, blend all the ingredients until completely smooth. Empty into a plastic bag and let harden in the fridge while you make the Double Chocolate Chip Cookies.
Double Chocolate Chip Cookies:
-
2/3 c Walnuts
-
2/3 c Dates
-
3 tbls Cacao Powder
-
3 tbls Cacao Nibs (this will provide the chocolate chip crunch)
-
1/2 tsp Vanilla Powder
In a food processor, process the walnuts, then add the dates and after add the rest of the ingredients. Roll the dough into 1 1/2 tbls size balls and form into cookie shapes.
To frost, cut/poke a tiny 1 mm hole in the plastic bag. With a steady hand, frost 3 cross lines across the cookie that all meet in the middle. Then add 2-3 circles to resemble cobwebs over the top of the crossed lines. For safe storage, face cookies side by side so as to not destroy the cobweb frosting.
Makes 16-18 cookies
Caramel Apples
My favorite time of the year is here, Halloween! Being born in October, I have had an obsessional love for Halloween since I was 5! I would pull out the Halloween box in August and run around at the end of summer wearing my Halloween costume. Outside of the States, Halloween is still quite a new holiday that is only slowly catching on. Usually when I start to talk about Halloween,  it is answered with the question, “When is Halloween?” You can see I am alone with trying to celebrate it. But I have started to make my own Halloween and this year I started celebrating with a Pumpkin Carving Party! It was very interesting explaining how to carve a pumpkin to my German guests. At one point the Americans were sitting on the floor carving and the German’s stood together talking about soccer! But with a bit of cinnamon apple cider and The Simpsons Treehouse of Horror Specials playing in the background everyone got their hands in their pumpkin. And they all turned out pretty spooky including the Obama one!
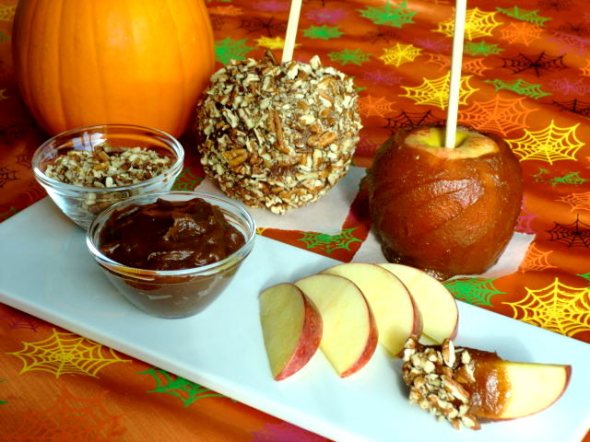
To kick start my favorite holiday of the year I created these Raw Caramel Apples. They were so simple and delicious! I could not believe how similar they tasted to caramel!
Raw Caramel Apples
Raw Caramel:
- 1 c Soft Dates such as Majool, at room temperature
- 1/2 c Almond Milk
- 1/2 tsp Maca Powder (optional, for flavor)
- Pinch Vanilla Powder
- Pinch Celtic Sea Salt
Blend all the ingredients in a blender until completely smooth. Scape down the sides of the blender and rock the blender to help the thick caramel blend completely.
For 4 Caramel Apples, stab each apple with a stick. Empty the caramel in a shallow bowl and rotate each apple in the caramel. Use a butter knife to smooth over the surface of each apple. Pat each caramel apple with crushed pecans if desired.
For Caramel Apple Slices, empty the caramel and crushed pecans into separate bowls for dipping. Serve with sliced apples.
Makes 4 Caramel Apples
Almond Orange Cookies
I found myself in Oslo last weekend. A small city packed with new and old and fashionably dressed blond women. I started with taking a ferry to Bygdøy, an area filled with museums and lovely Norwegian homes. Out of all the museums I visited, the Viking museum with an 1,100 year old completely preserved Viking Ship (pictured lower right) was the most interesting. The detailed wood carved ship was a piece of art in itself. And walking from one museum to the next I couldn’t help my fascination with the Norwegian homes. They possess quite a pleasant Nordic charm.
While running from museum, to palace, to castle, to shop, I kept my eyes out for a Kransekake. The link shows a Norwegian chef preparing this traditional almond circular cake, stacked high and decorated with Norwegian flags or ribbons. The Kransekake are usually made for weddings, Christmas or other special occasions and are astonishing beautiful for how simple they are made. Once home I set to work creating these Almond Orange Cookies, my own simplified version. They turned out wonderfully chewy with a perfect almond flavor and a light orange kick. These lovely cookies are absolutely divine tasting, it is impossible to only eat one!
Almond Orange Cookies
-
1 1/4 c Almond Meal
-
1/4 c Agave Nectar
-
2 tbls Raw Almond Butter
-
6-8 drops Almond Extract
-
1 1/2 tsp Orange Zest, finely chopped
-
Pinch of Celtic Sea Salt
-
14-16 Raw Whole Almonds, to top each cookie
Add all the ingredients in a bowl and mix with a spatula. Roll into 1 1/2 tbls size balls or cookie shapes and top with an almond. These are very sticky so it is best to separate them with plastic wrap and keep in the fridge. For a chewier cookies shape into cookies, top with an almond and dehydrate for 10-12 hours at 115 Degrees Fahrenheit.
Makes 14-16 cookies
Apple Strudel Cheesecake
It’s the opening weekend of the Oktoberfest here in Germany and although we are living far north of Munich I was determined to celebrate this holiday in full Bavarian spirit! We have been to the Hofbräuhaus in Hamburg, of which the Munich original is the country’s most famous of brewery beer houses. There were hundreds of men and women dressed in the traditional Bavarian outfits, Lederhosen and Dirndls. Germans take Oktoberfest very seriously, so I had to be no exception!
I really enjoyed my night and seeing what the Oktoberfest was all about! One thing I noticed was the food and beer were heavy and hearty. So today I decided to enter the SOS Challenge to use the season fruit, APPLES, and recreated this cheesecake version of a traditional Bavarian dessert! This Apple Strudel Cheesecake is served the traditional way with apples and raisins and topped with a warm Vanilla Sauce. This was the perfect roundup to my first Oktoberfest weekend!
Apple Strudel Cheesecake
Almond Walnut Crust:
- 1/2 c Walnuts, optional soaked for 8 hours and left out to dry or dehydrated
- 1/2 c Almond Meal
- 1/2 c Dates
- 2 tbls Filtered Water
- 1/2 tsp Cinnamon
- 1/2 tsp Vanilla Powder
- Pinch of Celtic Sea Salt
First process the walnuts until a meal forms. Add the almond meal and the cinnamon, vanilla and salt and process for a few seconds to mix. Next add the dates and process. Lastly, add the water and process until a single ball forms. Dump into a 8″ spring pan and press into the bottom.
Apple Strudel Cheesecake filling:
- 1 Apple
- 1 tsp Lemon Juice
- 1 1/2 c Cashews, optional soaked for 2 hours
- 3/4 c Pure Apple Juice
- 2 tbls Almond Milk
- 2 tbls Agave Nectar
- 1/4 c Coconut Oil
- 1/2 tbls Lemon Zest
- 1/2 tsp Cinnamon
- 1/2 tsp Nutmeg
Core the apple and blend the apple and lemon juice in a Magic Bullet or blender until completely smooth. Pour into the blender and add the rest of the ingredients and blend until completely smooth. Pour over the crust and freeze about 1-2 hours or place in the fridge overnight to set.
Apple Topping:
- 2 Apples
- Juice from 1 Lemon
- 2-3 tbls Raisins or Sultans
Core and thinly slice the apple. Dip each slice briefly in the lemon juice, this will prevent the apples from browning. Top the cheesecake with the apple slices and sprinkle the raisins or sultans over the top.
Vanilla Sauce:
- 1/3 c Cashews, optional soaked for 2 hours
- 1/3 c Filtered Water
- 2 tsp Agave Nectar
- 1 tsp Liquid Vanilla
- 1/4 tsp Vanilla Powder
Blend all the ingredients in a Magic Bullet or Blender until completely smooth. Either pour over the cheesecake before serving or drizzle each slice with Vanilla Sauce.
Makes 1 8″ cheesecake
Raspberry Belgium Chocolates
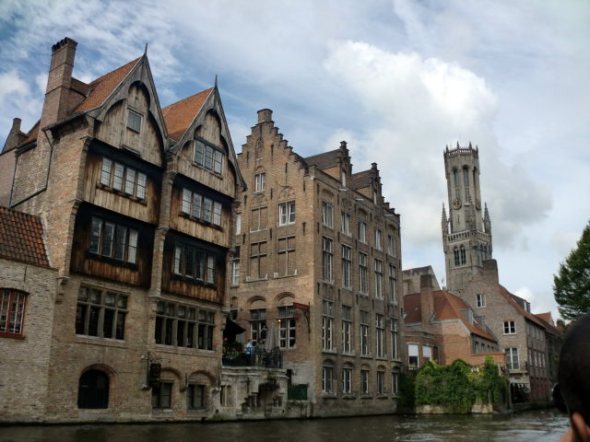
Last weekends adventures took me to Brussels and Bruges. The land of Belgium chocolate, waffles, double deep-fried fries and much more tempting non-raw delicatesses. My Aunt and Uncle were dying to see and eat everything in the city. So we hit all the sites, visiting several chocolate shops and walked down the tiny cobblestone alleyways. We also took a canal cruise in Bruges, a gorgeous almost fairytale like Medieval village.

I was so fascinated with how well-preserved the village was and just adored every building whether it was the Church of our Lady with Michelangelo’s Madonna and Child, the Belfry bell tower or the historic Grote Market Square, a World Heritage Site of UNESCO. My Uncle, a professional photographer was making us walk at the speed of a snail with all the photos he was taking. I didn’t mind since the city was eye candy in itself and I’m hoping you could see why!
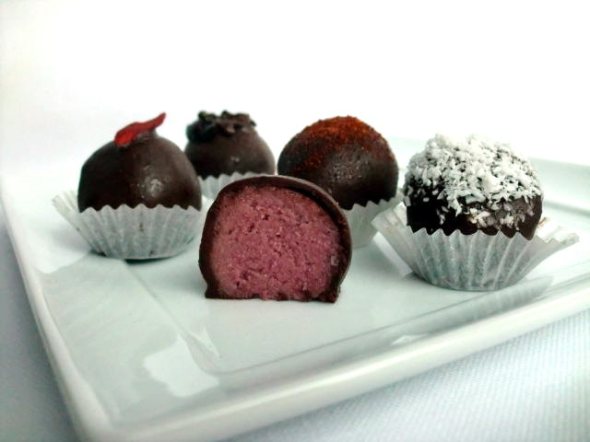
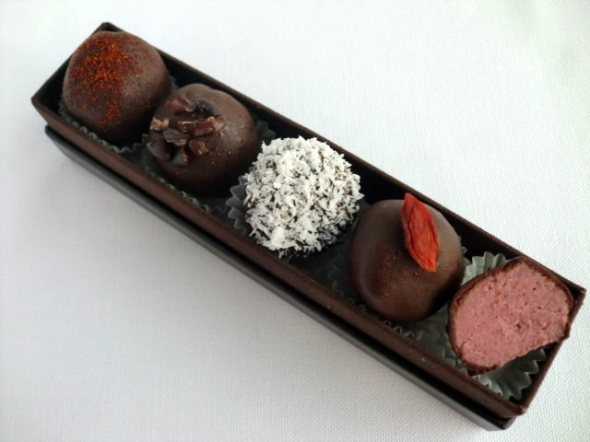
While in Brussels we decided to participate in a chocolate making course at Planète Chocolat, which made our trip truly rememberable! And as soon as I got home I went to work on these raw Raspberry Belgium Chocolates. Filled with a light Raspberry Cream, coated with a dark Belgium Chocolate and topped with either chilli powder, cacao nibs, coconut, goji berries or left to their original dark chocolate shell. They are incredible soft, melt in your mouth and I believe they would have made our Chocolatier at Planète Chocolat very proud!
Raspberry Belgium Chocolates
Raspberry Cream Filling:
- 1/3 c soft Date + 3-4 tbls Filtered water
- 3/4 c Raspberries
- 1 1/2 tsp Lemon Juice
- 1/4 c Coconut Oil
- 1/4 c Cashew, soaked for 2 hours optional
- 1 tsp Vanilla extract
- 1 Vanilla Bean
- Pinch of Celtic Sea Salt
Blend the dates and water until completely incorporated and resemble a paste. If it is still too stiff add more water 1 tbls at a time. Remove from the blender and set aside.
Blend the raspberries and lemon juice briefly and pour into a mesh sieve over a glass bowl in order to filter out the seeds. Use a spatula to move and push the raspberry pulp around in order to separate the juice from the seeds. The raspberry juice should yield 1/2 c of juice.
Blend all the ingredients until completely smooth. Pour into a bowl and cover with plastic wrap. Let set in the freezer for 20 min or until solid but not frozen, or leave overnight in the fridge.
To shape into balls, use a 1/2 tbls size measuring and scoop out the cream onto a wax paper surface. Roll into balls using the palm of your hands. The Raspberry Cream is a very soft cream so it starts to get too soft, then return to the freezer for 10 minutes or until solid. Once all the balls are rolled, return to the fridge until just before they are ready to dip into the Belgium Chocolate.
Belgium Chocolate:
- 1/3 c Cacao Butter
- 1/3 c Cacao Powder
- 3 tbls Agave Nectar
- 1/2 tsp Vanilla Powder
- Pinch of Celtic Sea Salt
- Pinch of Chili Powder
Bring 2 cups of water to a simmer in a small saucepan. Place the cacao butter in a medium size glass bowl and place the bowl over the top of the saucepan. Stir with a wooden spoon until the cacao butter is completely melted. Stir in the agave, vanilla, salt and chili powder. Turn off the stove and while continuing to stir, shift in the cacao powder.
To dip each ball in the chocolate, place a toothpick in each of the Raspberry Cream ball. Dip it in the melted chocolate and continue to turn the ball until all the excess chocolate drips off. Holding the chocolate covered ball upright, slide just the tip of a fork off under the ball, very carefully slide the ball onto a non-stick sheet. Repeat until all the balls are covered.
If you like to add a little extra to the Raspberry Belgium Chocolate top with either chilli powder, cacao nibs, coconut or goji berries. Place back in refrigerator to set the chocolate.
Makes 20 Raspberry Belgium Chocolates
Cinnamon Blueberry Törtchen
Last week my friend Ai was visiting, and for the weekend we decided to travel to the lovely city of Bremen. We spent the day walking around the old town square, visiting the churches and discovered Schnoorviertel. This is the oldest quarter of the city filled with tiny cottages dating back to the 15th century. We stopped for iced tea’s in the most inviting tea house and got carried away with smelling every flavor they had on display and I couldn’t help myself from purchased the most wonderful smelling Chai Tea. In the evening Bremen Music Festival started, so the town hall, churches, music hall and surrounding building in the square were lit up with spotlights with the church bells ringing! It was truly a memorizing moment! And thanks to this photo provided by Nikolai Wolff you can experience what it was like! Click on the photo to see the full screen shot.
While walking around Bremen and Hamburg, the one thing that Ai kept commenting on was how she loved the German bakeries. Each bakery had their own assortment of cinnamon, buttery pastries overflowing with custard or fruit jelly fillings. So on her last night we made a raw version based on her favorite pastry, these Cinnamon Blueberry Törtchen (“small tarts” in German). I packed up a few for her to take on her flight home and the rest I have enjoying with a warm cup of my new Chai Tea!
Cinnamon Blueberry Törtchen
Cinnamon Pastry:
- 1/2 c Dates
- 1/2 c Almond Meal
- 2 tbls Cinnamon
- 1/2 tsp Nutmeg
- 1 tbls Filtered Water
- Pinch of Celtic Salt
First process the dates in the food processor, then add the rest of the ingredients. Add a tbls of water if the mixture is too dry. Using a tbls measuring spoon, spoon in 1 tbls of Cinnamon Pastry into each hole of a small cupcake tray. Mold with your fingers into small tart shapes.
Blueberry Jelly:
- 1/2 c Blueberries or any other fruit
- 13 Blueberries for topping
- 1/2 tsp Lemon Juice
- 1 tbls Flax Meal
- 1 tsp Agave Nectar
Blend all the ingredients until smooth. Spoon the jelly into each tart and top with an additional blueberry.
Makes 13 Tartlets
Swiss Apricot Tart
Switzerland, out of all of the places I have been in the world I would move there immediately if I had the chance! Last summer I visited my cousins in a village near Lake Geneva and fell in love with the country. Looking onto Lake Geneva with the reflection of the Alps, you can not tell which is real and which is the reflection.
Switzerland is one of the most breathtaking places with the Alps standing guard over you at ever turn. We spent the weekend visiting nearby villages, having a BBQ in a cabin way up in the Alps and eating apricots by the dozens!
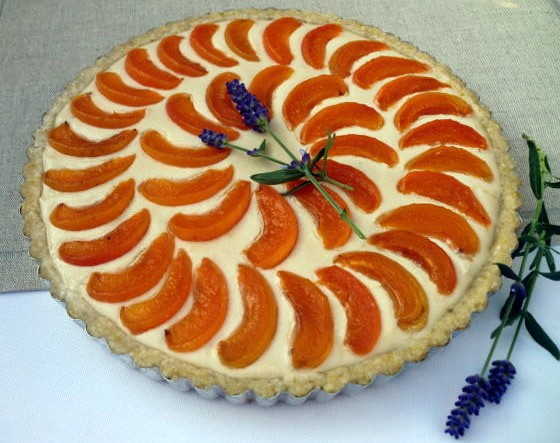
The apricots were so addictively sweet and they were everywhere. I never noticed apricots while living in the States but now I am obsessed with their super sweet flavor. My Aunt made a simple tart with a puff pastry crust and apricots layered over the top. So simple and sweet that I had to make a raw version. This Swiss Apricot Tart has a Vanilla Custard filling over a light White Pastry Crust and topped with lovely apricots!
Swiss Apricot Tart
White Pastry Crust:
-
1 c Cashews
-
3/4 c Macadamia Nuts
-
1/4 c Dried Unsweetened Shaved Coconut
-
2 tbls Coconut Oil, melted
-
1 tbls Agave Nectar
-
1 tbls Lemon Juice
-
1 tbls Lemon Zest, finely chopped
-
1 tsp Vanilla Powder
-
Pinch of Celtic Sea Salt
Process the macadamia nuts and cashews in the food processor until a meal forms. Add the rest of the ingredients and process until the dough is sticky. Empty into a tart pan and firmly press the dough into place being sure to leave a 1/4 inch lip around the edges. Set in the freezer while you prepare the Vanilla Custard Filling.
Vanilla Custard Filling:
- 2 c Cashews
- 1/2 c Agave Nectar
- 1/3 c Filtered Water
- 1/4 c Lemon Juice
- 2 tsp Vanilla Powder
- Pinch of Celtic Sea Salt
Blend all the ingredients until completely smooth. Pour into the pie crust and smooth over with a spatula.
Apricot Topping:
- 6-8 Apricots
- 2 tbls Lemon Juice
Pit and slice the apricots length wise and lightly dip them in the lemon juice. This will prevent the apricots from browning. Arrange them over the top of the tart.
Makes 1 9″ Tart or Pie
Cinnamon Pancakes
Our lazy Sunday mornings consist of making a large breakfast and enjoy it together over leisure conversation while blocking out the rest of the world. No TV, no newspaper, just the company of each other and our puppy. It’s been a tradition since I was young and I remember waking up on the weekend to the smell of breakfast being made with my Dad asking from the kitchen how I would like my eggs. Well the food has changed but not the tradition of sitting down and enjoying the time together. Just like my Dad, my favorite meal of the day is breakfast so I am constantly looking for ways of making my classic Sunday breakfasts’ healthier. One of my best-loved Sunday morning options are these scrumptious Cinnamon Pancakes, warm tasting, sweet and overflowing with fruit. Selene at Veganlicious had the genius idea of adding bananas as the binding agent and I had to make my own version! Thanks Selene for the inspiration! Serve these Cinnamon Pancakes with Lavender Honey or warm Maple Syrup!
Cinnamon Pancakes
- 1 c Ground Flax or 3/4 c Whole Flax
- 2 Bananas
- 1 1/2 tbls Maple Syrup or Agave Nectar
- 1 tbls Cinnamon
- 1 tsp Nutmeg
- 1/2 tsp Allspice
- 1/2 tsp Cloves
Grind the flax using the flat blade in a Magic Bullet, personal blender or grinder until a meal forms. Empty into a medium size bowl. Blend the rest of the ingredients and empty into the bowl with the flax meal. Lightly fold the mixture together and let sit for 5 minutes while you prepare the Fruit Topping. This will allow the flax meal to become thicker.
Fruit Topping:
- 2 Bananas
- 3/4 c Mixed Berries
- 1/4 tsp Cinnamon
- 1/4 tsp Nutmeg
Slice the bananas lengthwise about 1/4 inch thick. Wash the berries and dry with a paper towel.
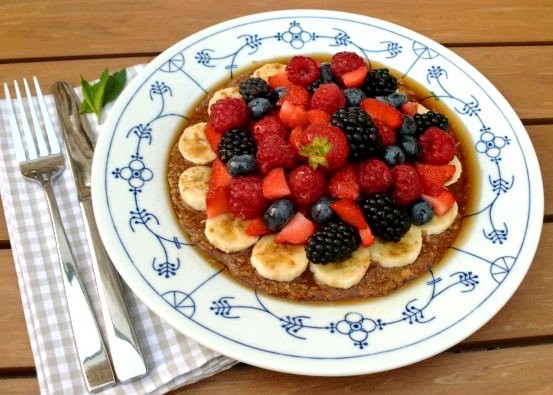
To assemble, divide the sticky, thick Cinnamon Pancake batter in half over two large plates. Using a spatula smooth out the surface into a round circular pancake form. Top with the banana slices and sprinkle with cinnamon and nutmeg. Top with the mixed berries and drizzle with Maple Syrup, Honey or Agave Nectar.
Makes 2 large Pancakes
Sweetly Raw Parfait Challenge
This weekend I embarked upon the Sweetly Raw Dessert Challenge to try a mouth watering Parfait from Heather Paces’ new ebook Raw Party Parfait. This ebook is fantastic, perfect suggestions for all seasons with summer fruit parfaits or winter chocolate parfaits! All the recipes are gorgeous looking, simple to prepare and only require a blender. If you have not already purchased this ebook, then you may miss out on these spectacular gourmet desserts! I also recommend her Just Desserts ebook as it is full of cakes, cookies, puddings and so much more! I have made several desserts from this ebook and have never been disappointed! Heather Pace is an inspiring Raw Dessert Queen!
In her Raw Party Parfait ebook each parfait is more delicious sounding than the last and I had difficulty picking which one to make first. But in the end I mixed 2 parfait layers, the Blueberry Jelly with the Dark Chocolate Mousse to make this delicious Blueberry Dark Chocolate Parfait. As these are not my recipes, you will need to purchase the ebook to get the full recipes.
For the Blueberry Jelly I halved the recipe and substituted the chia seeds with flax meal as chai seeds are not locally available. I made this layer first so that the flax meal had at least 5 minutes to allow the blueberries to thicken. Surprisingly, I achieved a perfect jelly consistency using flax meal and I think I might even use this recipe for my PBJ raw sandwiches!
The Dark Chocolate Mousse turned out delicious! I used the full recipe as I wanted a full chocolate experience and left out the vanilla powder and dates and added 2 bananas instead. In my experience with my Chocolate Banana Cream filling in my Chocolate Dream Pie, the bananas along with the avocado, added the sweetness and even more frothy consistency.
As an added decoration I made Dark Chocolate Mousse ‘Cookies.’ This was really simple, I wrapped a small cutting board in plastic wrap and plopped 4 small Dark Chocolate Mousse small cookie size circles on the surface. I froze this for a minimum of 20 minutes and only peeled them off the cutting board right before I served the Parfaits.
To assemble the Parfait, I used 4 tall glasses that had a volume of 1 1/4 c and spooned in a large layer, about 3-4 tbls of Dark Chocolate Mousse in the bottom of each. I wanted an extra chocolate punch so I made the Blueberry Jelly half the height of the chocolate layers, about 1 1/2-2 tbls. I continued this layering process for about 3 layers of each and topped the Parfaits with a frozen Dark Chocolate Mousse ‘Cookie’ and an edible fuchsia colored flower, a perfect Heather Pace touch!
I enjoyed these in my favorite summer spot, the garden balcony, gazing out onto the European church steeples of Hamburg and listening the birds fly by on a quiet Sunday summers evening. They were so beautiful we couldn’t resist eating dessert before dinner! The other 2 Blueberry Dark Chocolate Parfaits are for tomorrow night. Thank you Heather for giving me something to look forward to on a Monday!
Lemon Icebox Cookies
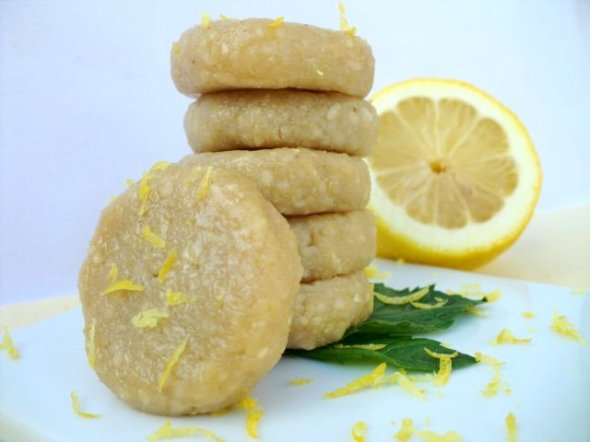
It is the hottest July ever recorded here in Hamburg! I feel like I’m melting every time I step outside! And besides cold showers, one of the many ways I’m cooling off is enjoying these Southern inspired Lemon Icebox Cookies. These summer cookies have a delicate tangy and sweet flavor that melt in your mouth. This recipe makes a double batch and I keep half in the freezer at home and the other half at work. So anytime I feel like enjoying a cool treat or feel like the heat is melting me, I grab one of these from the freezer and enjoy it with Watermelon Juice or Sweet Tea!
Lemon Icebox Cookies
- 2 c Cashews
- 1/4 c Agave Nectar
- 3 tbls Lemon Juice
- 2 1/2 tbls Lemon Zest, finely chopped
- 1 tsp Vanilla Powder
- 1/4 tsp Celtic Sea Salt
Grind the cashews in a food processor until a powdery meal forms. Add the rest of the ingredients and continue processing on low until the dough forms a large ball. Measure out 1 1/2 tbls size cookies out and roll and flatten into cookies shapes. These can be as thick as you want, 1/4 to 1/2 inch thick. Place in a plastic bag in the freezer. These will keep for up to 3 months.
Makes 2 Dozen cookies
Watermelon Juice
Watermelon Juice
It has been a heatwave here in Hamburg and I have discovered so many new things with this weather. For example, I’m riding my bike the 7 km/4.5 ml to and from work, hitting golf balls at the driving range and discovering new drinks to rehydrate. And the drink of the summer is Watermelon Juice! It’s beautiful, it’s pink and it’s exploding with sweet flavor! It’s exactly what your body needs in this peak of the summer heat!
The work is minimal, chop the watermelon as usual but into smaller cubes. Add to the blender, with the seeds still in the watermelon and blend on low just enough till it starts to swirl around like a liquid. You might need to use a muddler to push down the watermelon. Strain the seeds by pouring the juice through a nut milk bag, mesh strainer or cheesecloth. Since watermelons are basically all water and small amount of pulp, they produce so much juice and I had to run out and buy more bottles to store it in. There seems to never be enough of this absolutely delicious drink as we are always grabbing a bottle to take to the beach, work or to enjoy on the balcony on a hot summer evening. Happy Heatwave Everyone!!
July Berry Cream Cups
Last week was very exciting for the Bee’s Knees Kitchen! First my Rainbow Salad with Spicy Thai Dressing was featured on Crazy Sexy Life.com newsletter! Crazy Sexy Life.com is a website, blog and platform for people either living with cancer, severe disease or people who want to live healthier lives. Kris, a raw vegan cancer survivor and her team of experts launched the site to connect people, let others share their experiences, recipes, exercise tips and find support. Please check out the site as I find it very informative as a person interested in alternative health.
Then, even more exciting was being featured on lean Kitchen.com as an International Guest Blogger with my Fresh Fruit Bruschetta. Nedah, the creator behind lean Kitchen.com is on a mission to create meals that support the body’s metabolism. She does this through her blog and radio show which airs on Wednesday mornings in Vermont. Her philosophy is to include one lean protein and one fibrous carbohydrate in each meal. This is why my Fresh Fruit Bruschetta works well, as the cucumber is carb and the greek yogurt (which she suggests to eat with the Bruschetta) is the protein. Please check out her site, it is very personable and has wonderful recipes!
So with all this excitement I decided to celebrate one more thing, 4th of July! With these beautiful July Berry Cream Cups, you’ll have all the neighbors coming to your house! Layered with fresh fruit and sweet cream, these are the perfect red, white and blue dessert! Make these in the morning and store them in the fridge till you are ready to start the food and fireworks!
July Berry Cream Cups
Strawberry Layer:
- 1 c Strawberries
- 1/3 c Dates
Cream Layer:
- 1/2 c Almond Milk or Coconut Milk
- 3/4 c Cashews, soaked for 2 hours or more
- 2 tbls light Agave Nectar or Honey
- 1/4 c Dried Unsweetened Shaved Coconut
Dark Berry Layer:
- 3/4 c Blackberries
- 1/4 c Blueberries
- 1/4 c Dates
Blend each layer separately in a Magic Bullet or blender. Individually empty each layer into a separate plastic baggie.
Blueberry Toppings:
- 2 c Blueberries
- 6 candles or sparklers
To assemble, cut the corners off of each plastic baggies containing the Strawberry, Cream and Dark Berry. As equally as you can, distribute the layer equally between the 6 glasses by squeezing on each bag. Start with the Strawberry, then Cream and lastly the Dark Berry layer. Top each cup with a 1/3 cup of Blueberries and store in fridge for 1 hour or more. Light a candle or sparkler on each cup before serving. (Please assist all children with the object on fire.)
Makes 6 individual desserts
Chocolate Strawberry Tart
This sinfully delicious Chocolate Strawberry Tart is a thing of beauty! It was my first raw dessert I ever made and wow did it win me over! So how is the tart so blissful tasting? It starts with a warm-flavored Pecan Crust coated with a dark Chocolate Sauce. Then topped with fresh slice strawberries and drowned in a sweetened Strawberry Glaze. One bite of this rich and decadent Chocolate Strawberry Tart, and your taste buds will sing for more!
Chocolate Strawberry Tart
- 2 1/4 c Pecans
- 1/4 tsp Celtic Sea Salt
- 1 c Dates, tightly packed
- 2 tbls Filtered Water (optional, if the dates are dry)
To make the crust, process the pecans in the food processor until they form a fine meal. Add the dates and salt and continue until the dates are combined. Add the water and process on a low speed, about 10 seconds until large clumps start to form. Wipe the inside of a 10″ spring pan with coconut oil and empty the pecan mixture into the spring pan. Firmly press the crust into place being sure to make a 1/2 inch lip around the edges.
Chocolate Sauce:
- 1/3 c Maple Syrup or Agave Nectar
- 1/4 c Coco Powder
Blend the ingredients using a whisk. Pour into a sealable pouring container. Save for drizzling over each slice.
Strawberry Filling and Glaze:
- 2 lbs Strawberries
- 1/4 c Dates
- 2 tsp Lemon juice
Let the dates soften in warm water. Slice 2/3 of the strawberries into 1/4 inch slices. Drain the dates and blend the dates, remaining strawberries and lemon juice in a Magic Bullet or blender until completely combined. Line the crust with 1 layer sliced strawberries.
Pour half the Strawberry Glaze over the 1st layer of sliced strawberries and smooth over with a spatula. Line again with the 2nd layer of sliced strawberries and pour the remaining Strawberry Glaze over the top and smooth over. Place in the fridge for 1 hour or overnight to set.
To serve, slide a butter knife around the inside of the pan to separate the crust from the pan. Remove the spring form sides, slice, plate and drizzle each slice with the Chocolate Sauce.
Makes 1 10″ Spring Pan Tart


